")
Assisting during microsurgery: important first steps

Related content
Scrub nurses or technicians can prepare for their role by learning about instruments and instrument trays, learning the steps of procedures, and reviewing surgical procedures with the surgeons they will assist.
When it comes to assisting during microsurgery, there is much you can learn and practise before you enter the operating theatre.
1. Learn about surgical instruments and trays
The first step in learning to assist during microsurgery is to learn the names of the instruments and to become familiar with the different types of instrument trays.
A good place to start is in the sterilisation area, where instruments are reprocessed and packed for sterilisation in preparation for surgery. While you are in the sterilisation area:
- Use an ophthalmic instrument catalogue to identify the different instruments
- Use a magnifying glass to look at the fine tips of hooks or lens manipulators.
Note: Ophthalmic microsurgical instruments are very delicate and have fine tips that need to be handled with great care.
Each type of surgery or ophthalmic subspecialty (e.g. cataract, squint, cornea, oculoplastic) has a different instrument tray, containing the instruments the surgeon will need. Instruments on each of these trays are categorised into:
- Forceps and clamps (forceps can be toothed, smooth, serrated, or micro-notched; straight, curved, or angled)
- Scissors (sharp or blunt tips; straight, curved, or angled)
- Needle holders (locking or non-locking; straight or curved)
- Hooks, lens manipulators, retractors, and loops
- Cannulated instruments, e.g., Simcoe and anterior chamber cannulas
- Blade handles
- Speculums, calipers, or rulers.
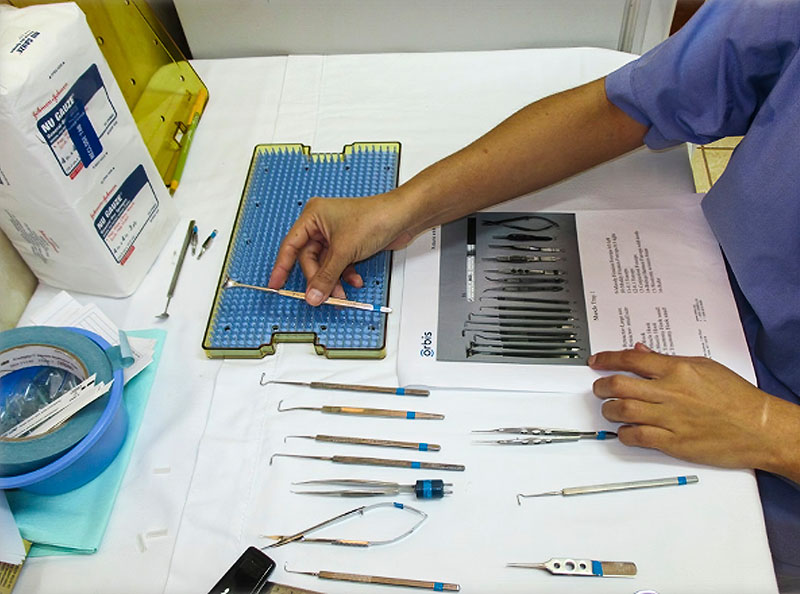
Ask a senior colleague to show you what each instrument tray should look like. Take a photograph or draw the tray, then label each instrument. Ask your colleague to check everything is correct and in place.
Teaching tip
Create a photograph or drawing of each type of instrument tray and label each instrument with its name. Allow the trainee nurse or technician to arrange the trays accordingly, in preparation for sterilisation (Figure 1).
2. Learn the steps of procedures
An excellent and safe way of preparing for a procedure is to learn the surgical steps and practise for them through simulation.
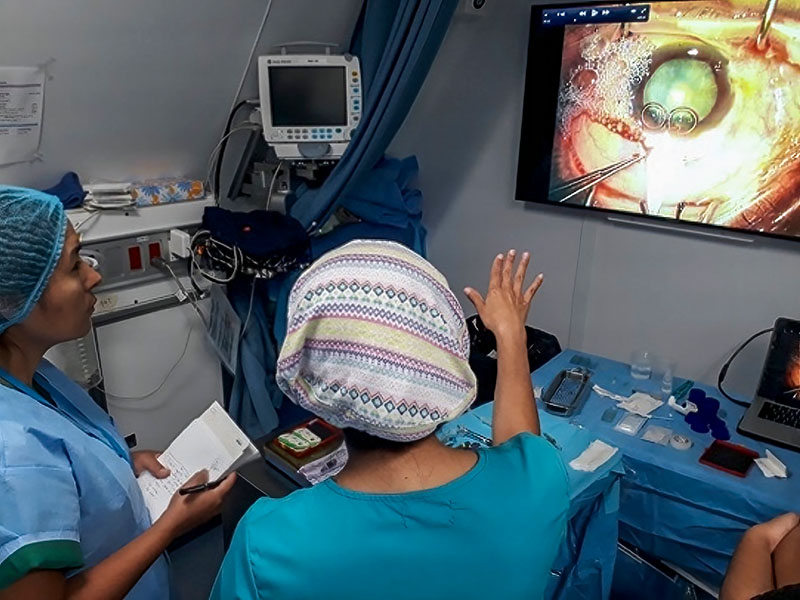
- Watch a video recording of the operation to be performed, or observe a live operation (Figure 2). Write down each surgical step and the instruments and supplies used. You can make a checklist, in table form (see Table 1).
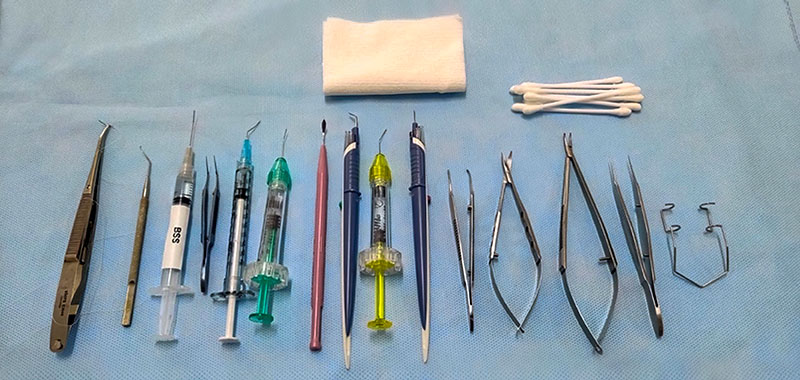
- Next, arrange the surgical instruments on a simulated/mock ‘sterile field’ in the same order as the surgical steps (Figure 3).
- If you have a smartphone, take a photo of the setup to remind yourself of the sequence of steps.
3. Review procedures with the surgeon
A scrub nurse or technician may work with a different surgeon every day. It is helpful to set aside time to review the basic steps of the next day’s surgical procedures with the surgeon, as this will help you to anticipate their needs more effectively.
I found it helpful to create a checklist, in table form, for the most common operations I’m likely to be involved in (Table 1), listing the surgical step, the type of consumable the surgeon may use, and the type of surgical instrument the surgeon may use.
Reviewing these steps with the surgeon may feel daunting at first, but you will become more confident the more you do it. When surgeons see that you are interested in being prepared, they will usually be happy to share this information, as it supports collaboration between surgeon and nurse, which can lead to better outcomes for patients.
Table 1 A checklist summarising the steps of small-incision cataract surgery and the supplies and instruments needed.
| Description of the step | Consumables/supplies | Surgical instrument |
|---|---|---|
| Placing speculum | Type: | |
| Place bridal/stay suture | Suture: |
|
| Dissect conjunctiva |
|
|
| Cautery to blood vessels | Eraser tip: | Cautery cable/cautery forceps |
| First scleral incision | Blade: | Fine-toothed forceps |
| Scleral tunnel | Blade: | Fine-toothed forceps |
| Paracentesis | Blade: | Fine-toothed forceps |
| Stain the anterior capsule | Vision blue/air bubble | |
| Flush with BSS | 2cc syringe & 27G cannula | |
| Viscoelastic injection | Type: | |
| Main sclerocorneal incision | Blade: | Fine-toothed forceps |
| Capsulotomy | Cystotome | Capsulorhexis forceps |
| Placement of AC maintainer | AC maintainer | |
| Hydrodissection |
|
|
| Enlarge main incision | Blade: | Fine-toothed forceps |
| Remove nucleus | Vectus loop | |
| Cortex removal |
|
|
| Viscoelastic | Type: | |
| Insertion of IOL | IOL: |
|
| Dial the IOL in place | Sinsky hook | |
| Remove viscoelastic |
|
|
| Hydrate wounds (BSS) | 2cc syringe & 27G cannula | |
| Check wounds for leakage | Microsponge | |
| Close conjunctiva | Suture: | Cautery cable/cautery forceps |
| Subconjunctival injection | 1cc syringe & 30G needle | |
| Remove bridal/stay suture | Scissors | |
| Eyedrops/ointment | ||
| Eye pad/eye shield |